
Use Room Estimator to Develop a Typical Layout
We can use AGi32’s Room Estimator Zonal Cavity tool to help us develop the lighting plan.
- Select the Viewpoint for the Open office ST-12.
- Use the Measure Distance command to determine the size of the open area over the workstations. Set Snap to .25’ and turn off the Snap-To command (F3) to make this easier.
- Measure the length and width of the space, it’s roughly 38 x 14.5.

-
Open Room Estimator.
- Select the pendant luminaire (E2-WS…) from the list.
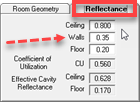
- Click on the Reflectances tab. As we really have only 3 walls, drop the wall reflectance from 50% to 35% (estimate as roughly ¾).
- Return to the Room Geometry tab.
- Enter the space dimensions of 38 x 14.5 x 10.
- Assume luminaires are suspended 2’ below the ceiling, work plane is standard desktop height of 2.5’.
- Set the Desired Average Illuminance at 40 fc with the Target radio button selected (closest result but may fall below 40).

Room Estimator says we will need twelve luminaires for an average illuminance level of 37 fc. We can export this result as a shortcut to utilize the luminaire locations from Room Estimator (we will need to remove other elements, more details to follow).
- Click on the black arrow icon in the upper left corner of the Room Estimator dialog. This is the Export command.
- This dialog closes, notice AGi32’s Model Mode cursor now has a rectangle attached which is the room size.
- Drag it to the lower left corner of the ST-12 area and click (below).

This export will drop all elements from the estimate into the location you selected. However, we don’t need the room or the calculation points. We only want the luminaires. We can quickly eliminate the unwanted elements.
- Once you have dropped the exported information, the calculation points dialog will appear. Simply click Cancel.
- Now we need to remove the room. You can see the north wall of the room, use the Delete Room command to remove it.

We can use a similar technique to determine how many downlights we need in the hallway to meet a 10 fc average. Instead of exporting we will simply note the spacing required and come back to locate them with an array.
- Use the Measure Distance command again to measure the length and width of the hallway adjacent to Open Office St-12. It’s roughly 90’ x 4’.
- Start Room Estimator again.
- Select the PD610… luminaire from the list.
- Enter the hallway dimensions, remember, these are recessed downlights so the Suspension Length is zero.
- Enter a Target illuminance level of 10 fc.

Layout Luminaires
It appears we need 7 downlights about 12’ apart.
- Close the Room Estimator dialog.
- Go to the luminaire toolkit and set the luminaire type to the PD610 downlight.
- Enter a mounting height of 10’ (recessed).
- Click Locate.
- Place the left most location at the top of the stairs, centered as shown below. You may need to adjust your cursor snap to 0.25’ if not already there.
- Right click to terminate the command.

We can now place an array of luminaires along the length of the hallway.
- Return to Viewpoint SW Corner – Level 1.
- Select the Array command from the Luminaire Toolkit.
- In the Array dialog simply enter the spacing of 12’ in the Left to Right cell.

- Click OK to exit the dialog and create the array.
- Select the existing downlight we located previously.
- Drag the cursor along the hallway and notice the new locations as gray dots.
- Click the cursor above, and to the right of the last new location as shown below.

 RESCUE
Open RESCUE-Intermed_Interior-5.AGI

